This post was updated on August 17th, 2020.
This is the fourth post in my series on setting up a basic Always On VPN deployment. In this post I will be covering the configuration of the user tunnel. Links to each individual post in this series can be found below.
Always On VPN - Basic Deployment Guide
Always On VPN - Certificates and Active Directory
Always On VPN - VPN and NPS Server Configuration
Always On VPN - Device Tunnel
Always On VPN - Troubleshooting
User Tunnel
The user tunnel must first be manually created and connected. The configuration data from that connection will then be exported into an XML file. Finally that XML file will be deployed to other systems to automatically create the tunnel.
Manually Create the Connection
Log into a Windows 10 1607 or newer computer with a user account that is a member of the AOVPN Users Active Directory group. The user account must also be a local administrator on the computer. Open certmgr.msc and ensure the user certificate has been successfully enrolled.
- Open the Windows 10 Settings app
- Navigate to Network & Internet > VPN
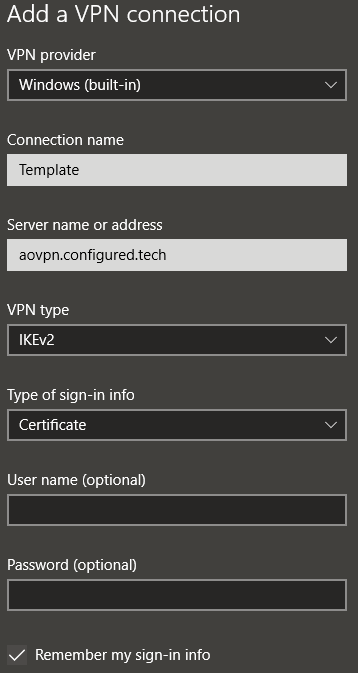
- Click Add a VPN connection
- VPN provider - Windows (built-in)
- Connection name - Template
- Server name or address - The external FQDN of the VPN server (aovpn.corp.com)
- VPN type - IKEv2
- Type of sign-in info - Certificate
- Click Save to close the configuration window
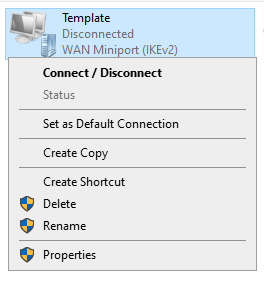
- Open the network connections window either by clicking Change adapter options or by running ncpa.cpl at the command line
- In the network connections window, right click on the Template VPN connection and select Properties
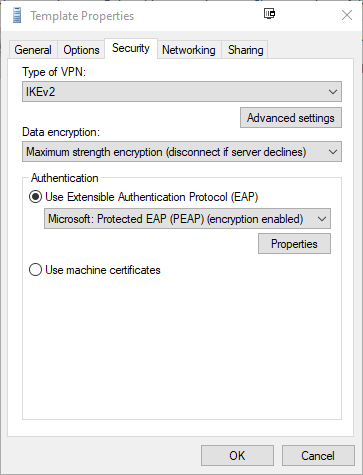
Navigate to the Security tab
Ensure Type of VPN is set to IKEv2
Change Data encryption to Maximum strength encryption (disconnect if server declines)
Under the Use Extensible Authentication Protocol (EAP) option, select Microsoft: Protected EAP (PEAP) (encryption enabled)
Click Properties
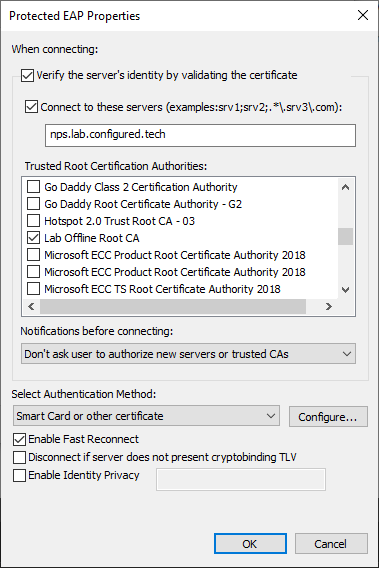
The Protected EAP Properties window is now open
Under Connect to these servers, type the FQDN of the NPS server
Under Trusted Root Certification Authorities, select the Root CA that issued the user authentication certificate
Under Notifications before connecting, select Don’t ask user to authorize new servers or trusted CAs
Under Select Authentication Method, select Smart Card or other certificate
Click Configure
- The Smart Card or other Certificate Properties window is now open
- Select User a certificate on this computer and click Advanced
- Check the Certificate Issuer box
- Select the Root CA from the list
- Click OK
- Under Connect to these servers, type the FQDN of the NPS server
- Under Trusted Root Certification Authorities, select the Root CA that issued the user authentication certificate
- Check the Don’t prompt user to authorize new servers or trusted certification authorities box
- Click OK 3 times to save and exit the VPN properties windows
- Select User a certificate on this computer and click Advanced
This next step is optional and only needs to be run if the IKEv2 security settings were modified during the setup of the VPN server.
- Open an administrative PowerShell window
- Run this script to update the IPsec security parameters for IKEv2
$connection = "Template"
Set-VpnConnectionIPsecConfiguration -ConnectionName $connection -AuthenticationTransformConstants SHA256128 -CipherTransformConstants AES128 -DHGroup Group14 -EncryptionMethod AES128 -IntegrityCheckMethod SHA256 -PFSgroup PFS2048 -Force
For more information about configuring enhanced IKEv2 security settings, refer to this post.
Now that the VPN adapter has been created, the next step is to establish a VPN tunnel connection. Connect the computer to a network that is outside of the corporate network, select the Template VPN adapter, and click Connect. If the connection is successful, then move on to the next section. If the connection was not successful, refer to the Troubleshooting section of this guide.
Create the XML Configuration File
Once the manually created VPN connection has been successfully connected at least once, the next step is to create a XML file containing the connection settings that can be deployed to additional systems.
The easiest way to create the XML file is to use PowerShell to extract the settings from the manually created VPN connection. These settings can then be written to an XML file. The script to extract and format these settings can be found here (Get-VPNClientProfileXML.ps1)
- Log into the computer where the user tunnel was created
- Ensure the logged-in user has local administrator rights on the system
- Download the Get-VPNClientProfileXML.ps1 script
- Open an administrative PowerShell window and run the Get-VPNClientProfileXML.ps1 script
Get-VPNClientProfileXML.ps1 -ConnectionName "Template" -xmlFilePath "C:\Temp\UserProfile.xml"
This will generate a new XML file containing the configuration data from the Template VPN connection.
Optional - Advanced XML Configuration
This example XML file will work for a basic deployment. However, more advanced deployments can require additional edits to the XML file. I am writing another post about more advanced XML configuration options. I’ll link to that post here once it is live.
Deploy the XML Configuration File
The Always On VPN profile(s) can be deployed using either PowerShell or Intune. In this post I will be using PowerShell and Configuration Manager. For information on using Intune to deploy Always On VPN, refer to these posts (Link1, Link2, Link3)
The PowerShell script to deploy the user tunnel can be found here (New-AovpnUserTunnel.ps1). This script will handle the creation of the VPN tunnel. For troubleshooting purposes, the script writes to a log file: C:\ProgramData\AOVPN\Install-AOVPN-User.log.
Download the script and optionally edit these lines:
- Line 33 - The default VPN connection name
- Line 37 - The registry key used for detection
- Line 38 - The registry value used for detection
- Line 39 - The version number to set the registry value to for detection
Copy the New-AovpnUserTunnel.ps1 script and the UserProfile.xml file to the Configuration Manager content source location on the network.
- Open the Configuration Manager console and navigate to Software Library > Application Management > Applications
- In the ribbon, click Create Application
- In the window that opens, select Manually specify the application information and click Next
- Enter a name for the application (Always On VPN User Tunnel) and click Next
- Optionally enter information on the Software Center page and click Next
- On the Deployment Types page, click Add…
- A new window opens
- In the Type menu, select Script Installer and click Next
- Enter a name for the deployment type “Always On VPN User Tunnel” and click Next
- In the Content location box, browse to the network location where the PowerShell script and XML file are stored
- In the Installation program box, enter this command
- If needed, change the names of the PowerShell script and XML file to match your files
PowerShell.exe -ExecutionPolicy Bypass -File "New-AovpnUserTunnel.ps1" -xmlFilePath UserProfile.xml
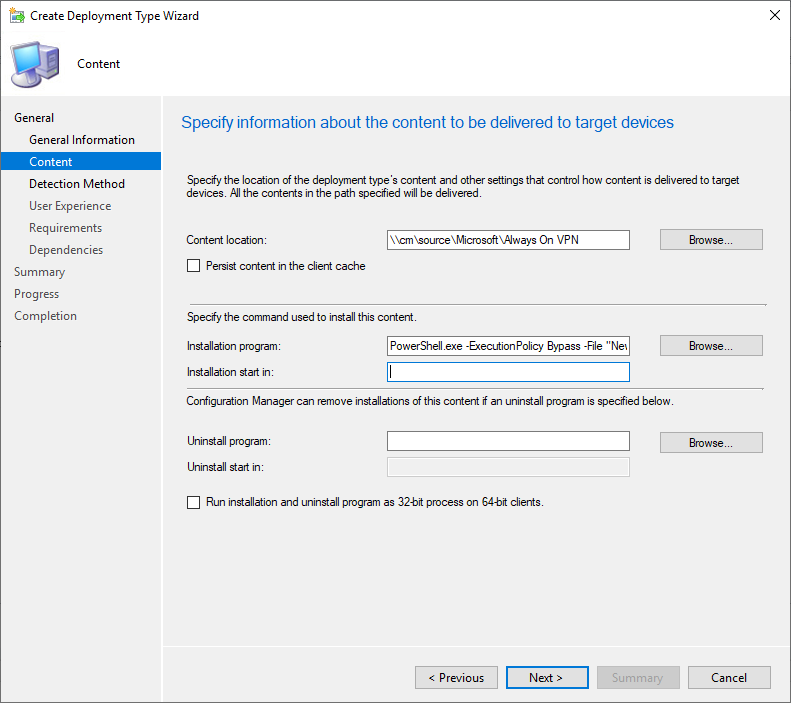
- After entering the installation command, click Next
- At the Detection Method page, select Use a custom script to detect the presence of this deployment type: and click Edit…
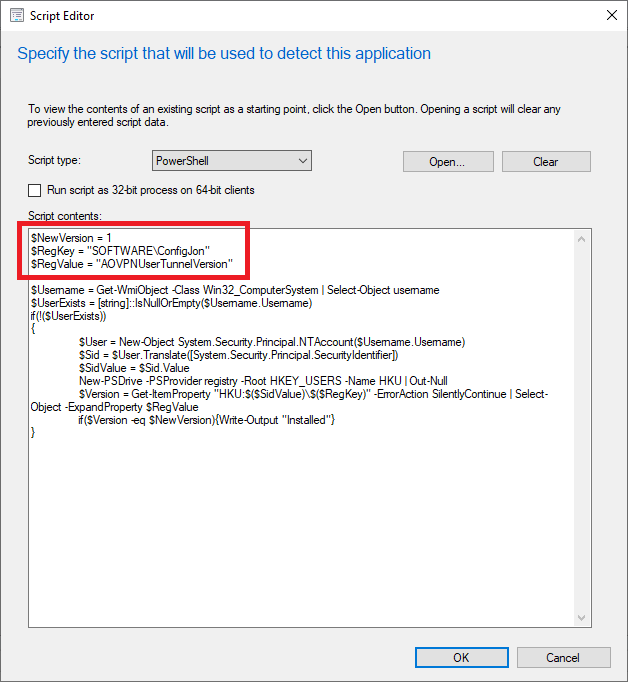
- In the Script type menu, select PowerShell
- In the Script contents box, enter this script
- On line 1 of the script, modify the version number to match the version specified in New-AovpnUserTunnel.ps1
- On line 2 of the script, modify the registry key to match the key specified in New-AovpnUserTunnel.ps1
- On Line 3 of the script, modify the registry value to match the value specified in New-AovpnUserTunnel.ps1
$NewVersion = 1
$RegKey = "SOFTWARE\ConfigJon"
$RegValue = "AOVPNUserTunnelVersion"

$Username = Get-WmiObject -Class Win32_ComputerSystem | Select-Object username
$UserExists = [string]::IsNullOrEmpty($Username.Username)
if(!($UserExists))
{
	$User = New-Object System.Security.Principal.NTAccount($Username.Username)
	$Sid = $User.Translate([System.Security.Principal.SecurityIdentifier])
	$SidValue = $Sid.Value
	New-PSDrive -PSProvider registry -Root HKEY_USERS -Name HKU | Out-Null
	$Version = Get-ItemProperty "HKU:$($SidValue)\$($RegKey)" -ErrorAction SilentlyContinue | Select-Object -ExpandProperty $RegValue
	if($Version -eq $NewVersion){Write-Output "Installed"}
}
- After entering the detection script, click OK to close the Script Editor window
- At the Detection Method page, click Next
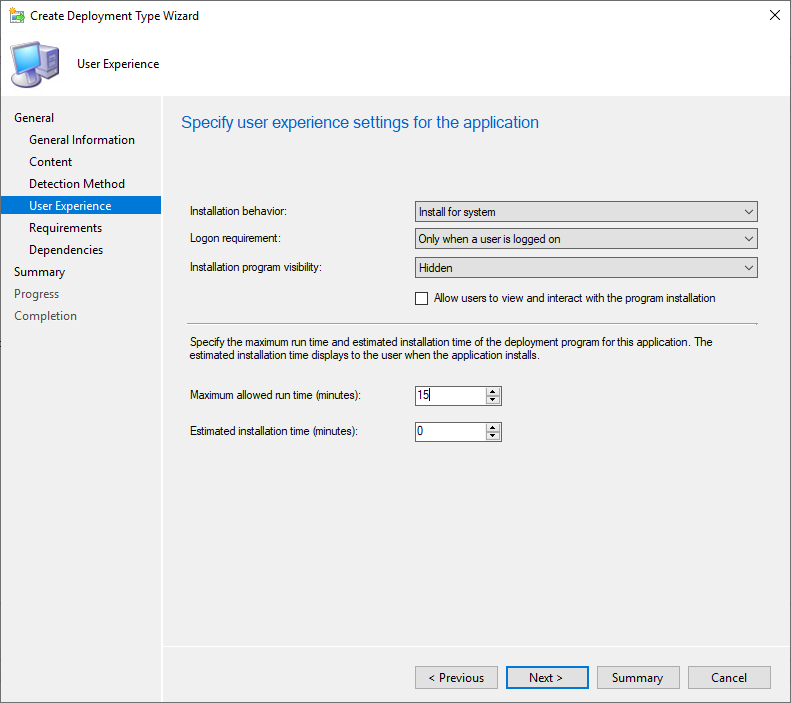
- At the User Experience page, select these options
- Install for System
- Only when a user is logged on
- Hidden
- Change the Maximum allowed runtime to 15 minutes
- Click Next
- Click Summary to go to the summary screen
- Click Next to complete the creation of the detection method
- Click Close
- At the Deployment Types page, click Next
- Click Next to complete the creation of the application
- Click Close
The application to deploy the Always On VPN User Tunnel has been created. The next steps are to distribute content for the application and deploy the application.
I have also created a script that can be used to remove Always On VPN User Tunnels from computers. That script can be found here Remove-AovpnUserTunnel.ps1. This script could be added to the application as the uninstall program.
This completes the user tunnel configuration portion of the deployment. The next post in the series is Always On VPN - Device Tunnel.