This post was updated on August 17th, 2020.
This is the fifth post in my series on setting up a basic Always On VPN deployment. In this post I will be covering the configuration of the device tunnel. Links to each individual post in this series can be found below.
Always On VPN - Basic Deployment Guide
Always On VPN - Certificates and Active Directory
Always On VPN - VPN and NPS Server Configuration
Always On VPN - User Tunnel
Always On VPN - Troubleshooting
Device Tunnel
Unlike the user tunnel, the device tunnel does not need to be manually created before being deployed. An XML file containing the configuration information for the device tunnel can be manually created and then directly deployed to devices.
Here is an example of a basic device tunnel XML configuration file.
<VPNProfile>
   <AlwaysOn>true</AlwaysOn>
   <DeviceTunnel>true</DeviceTunnel>
   <DnsSuffix>lab.configured.tech</DnsSuffix>
   <RegisterDNS>true</RegisterDNS>
   <TrustedNetworkDetection>lab.configured.tech</TrustedNetworkDetection>
   <NativeProfile>
      <Servers>aovpn.configured.tech</Servers>
      <RoutingPolicyType>SplitTunnel</RoutingPolicyType>
	  <NativeProtocolType>IKEv2</NativeProtocolType>
      <Authentication>
         <MachineMethod>Certificate</MachineMethod>
      </Authentication>
	  <DisableClassBasedDefaultRoute>true</DisableClassBasedDefaultRoute>
   </NativeProfile>
   <Route>
      <Address>192.168.1.200</Address>
      <PrefixSize>32</PrefixSize>
   </Route>
   <Route>
      <Address>192.168.1.201</Address>
      <PrefixSize>32</PrefixSize>
   </Route>
</VPNProfile>
There are a few environment specific values in this XML that will need to be modified before it can be deployed.
- DnsSuffix (Line 4) - This value is used to assign a DNS suffix to the VPN interface. This should be the internal FQDN of the enterprise network. Multiple values can be specified in a comma separated list
- TrustedNetworkDetection (Line 6) - This value is used to determine when the VPN connection should be attempted. If the device is on a trusted network, the VPN will not attempt to connect. This should be the internal FQDN of the enterprise network. Multiple values can be specified in a comma separated list
- Servers (Line 8) - This value is used to specify the external DNS name and/or IP of the VPN server. Multiple values can be specified in a comma separated list
- Route (Lines 16 - 23) - These values are used to specify which network resources can be reached through the VPN tunnel. The device tunnel should be limited to access resources required for device management (Domain Controllers, PKI, DNS, Configuration Manager). Additional routes can be added by duplicating the
<Route></Route>tag
After editing these values, save the XML file as DeviceProfile.xml.
Optional - Advanced XML Configuration
This example XML file will work for a basic deployment. However, more advanced deployments can require additional edits to the XML file. I am writing another post about more advanced XML configuration options. I’ll link to that post here once it is live.
Deploy the XML Configuration File
The Always On VPN profile(s) can be deployed using either PowerShell or Intune. In this post I will be using PowerShell and Configuration Manager. For information on using Intune to deploy Always On VPN, refer to these posts (Link1, Link2, Link3)
The PowerShell script to deploy the device tunnel can be found here (New-AovpnDeviceTunnel.ps1). This script will handle the creation of the VPN tunnel. For troubleshooting purposes, the script writes to a log file: C:\ProgramData\AOVPN\Install-AOVPN-Device.log.
Download the script and optionally edit these lines:
- Line 33 - The default VPN connection name
- Line 37 - The registry key used for detection
- Line 38 - The registry value used for detection
- Line 39 - The version number to set the registry value to for detection
Copy the New-AovpnDeviceTunnel.ps1 script and the DeviceProfile.xml file to the Configuration Manager content source location on the network.
- Open the Configuration Manager console and navigate to Software Library > Application Management > Applications
- In the ribbon, click Create Application
- In the window that opens, select Manually specify the application information and click Next
- Enter a name for the application (Always On VPN Device Tunnel) and click Next
- Optionally enter information on the Software Center page and click Next
- On the Deployment Types page, click Add…
- A new window opens
- In the Type menu, select Script Installer and click Next
- Enter a name for the deployment type “Always On VPN Device Tunnel” and click Next
- In the Content location box, browse to the network location where the PowerShell script and XML file are stored
- In the Installation program box, enter this command
- If needed, change the names of the PowerShell script and XML file to match your files
PowerShell.exe -ExecutionPolicy Bypass -File "New-AovpnDeviceTunnel.ps1" -xmlFilePath DeviceProfile.xml
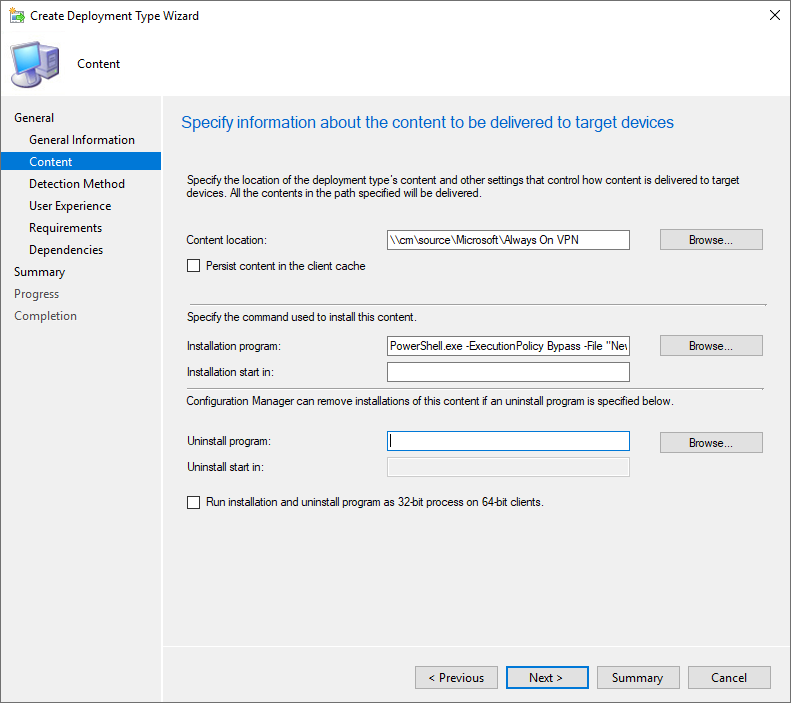
- After entering the installation command, click Next
- At the Detection Method page, click Add Clause…
- In the Setting Type menu, select Registry
- In the Hive menu, select HKEY_LOCAL_MACHINE
- In the Key box, enter the registry key that matches the key specified on line 37 of the New-AovpnDeviceTunnel script
- In the Value box, enter the value from line 38 of the New-AovpnDeviceTunnel script
- In the Data Type menu, select Integer
- Select This registry setting must satisfy the following rule to indicate the presence of this application
- In the Operator menu, select Equals
- In the Value box, enter the version number that matches the version specified on line 39 of the New-AovpnDeviceTunnel script
- Click OK to close the Detection Rule window

- At the Detection Method page, click Next
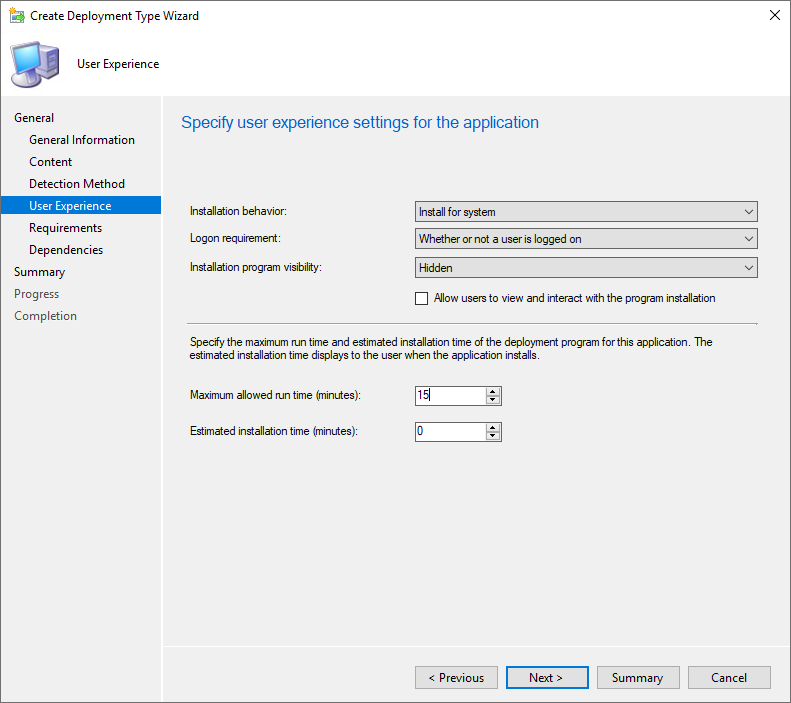
- At the User Experience page, select these options
- Install for System
- Whether or not a user is logged on
- Hidden
- Change the Maximum allowed runtime to 15 minutes
- Click Next
- Click Summary to go to the summary screen
- Click Next to complete the creation of the detection method
- Click Close
- At the Deployment Types page, click Next
- Click Next to complete the creation of the application
- Click Close
The application to deploy the Always On VPN Device Tunnel has been created. The next steps are to distribute content for the application and deploy the application.
I have also created a script that can be used to remove Always On VPN Device Tunnels from computers. That script can be found here Remove-AovpnDeviceTunnel.ps1. This script could be added to the application as the uninstall program.
This completes the device tunnel configuration portion of the deployment. The next post in the series is Always On VPN - Troubleshooting.