Update - May 21st, 2026
I’ve updated the script and information in this post to reflect the most recent release of the DellBIOSProvider PowerShell module (2.10.1 at the time of writing). For more details, see the script’s in-file .CHANGELOG block.
Dell BIOS settings and passwords can be accessed and modified using WMI classes. These WMI classes can be accessed directly (Dell BIOS Settings Management - WMI). However, Dell also provides a PowerShell module that simplifies some aspects of working with these WMI classes (Dell Command | PowerShell Provider). This post will discuss the requirements for using the Dell PowerShell Provider as well as the PowerShell script I wrote for installing and updating it.
If you’re just here for the script, you can find it on my GitHub: https://github.com/ConfigJon/Firmware-Management/blob/master/Dell/Install-DellBiosProvider.ps1
Prerequisites
Before the Dell PowerShell Provider can be installed and run, there are a few prerequisites that need to be in place.
- Windows Management Framework 3.0 and PowerShell 3.0 or newer
- Microsoft Visual C++ Redistributable 2015-2022
- Dell SMBIOS Version 2.4 or newer
Additionally, before installing the Dell PowerShell Provider in WinPE, these components need to be added to the boot image.
- Microsoft .NET (WinPE-NetFx)
- Scripting (WinPE-Scripting)
- Scripting (WinPE-WMI)
- Windows PowerShell (WinPE-PowerShell)
Some notes about the prerequisites:
- The WMF 3.0 and PowerShell 3.0 requirements will be met by default on any modern version of Windows or WinPE.
- If the target system SMBIOS version is lower than 2.4, apply the latest BIOS / Firmware update available from Dell.
- The Visual C++ Redistributables can be installed in full Windows. Alternatively, these .dll files can be copied into the Windows\System32 folder
- Dell Command PowerShell Provider 2.10.1
- msvcp140.dll
- vcruntime140.dll
- vcruntime140_1.dll
- Dell Command PowerShell Provider 2.10.1
- The WinPE-Scripting and WinPE-WMI components are included in Configuration Manager boot images by default. The WinPE-WMI and WinPE-PowerShell components need to be added in the Optional Components tab of the boot image Properties window.
- The script has logic to check for the SMBIOS version, PowerShell version, and Visual C++ .dll files. If any of these prerequisites are not met, the script will exit.
Installation
The Dell Command | PowerShell Provider is really just a PowerShell module called DellBIOSProvider. This module can be found on the PowerShell Gallery. I have created a PowerShell script that is able to verify the prerequisites are met and install the module.
The script has four optional parameters.
ModulePath - This parameter is used to specify the location of the DellBIOSProvider module source files. This parameter should be specified when the script is running in WinPE or when the system does not have internet access.
DllPath - This parameter is used to specify the location of the .dll files required to run the DellBIOSProvider module. This parameter should be specified when the script is running in WinPE or when the system does not have the required Visual C++ Redistributables installed. If you do not specify a folder using the DllPath parameter and the .dll files are missing on the system, the script will look for the .dll files in the script root directory.
Import - When specified, the DellBIOSProvider module is imported into the current session after installation. This is off by default. An import only affects the session running the script. A separate follow-up process (such as a later Intune or Configuration Manager step) starts a fresh session and has to import the modules it needs itself.
LogFile - Used to override the default log file path. The file must have a .log extension. See the Logging section below for details.
Install from the internet
The script is able to connect directly to the PowerShell Gallery to download and install the module. In order for this to work, the script needs to be running in a full Windows OS and the system needs to have internet access. To have the script install the module from the internet, run the script without specifying the ModulePath parameter.
Install from local source files
If the script is being run from WinPE or if the system does not have internet access, the DellBIOSProvider source files can be manually downloaded from the PowerShell Gallery. The module will download as a .nupkg file. Extract the contents of this file and place them in a folder. Specify that folder in the ModulePath parameter.
Alternatively, the module can be downloaded already in the correct format using Save-Module.
Save-Module -Name DellBIOSProvider -Path C:\DellBIOSProvider
Examples
Running in a full Windows OS with internet access and with the Visual C++ Redistributables installed.
Install-DellBiosProvider.ps1
Running in a full Windows OS with internet access but without the Visual C++ Redistributables installed. The required .dll files are in a folder named DllFiles. The folder is located in the same directory as the script file.
Install-DellBiosProvider.ps1 -DllPath DllFiles
Running in a WinPE OS. The DellBIOSProvider module source files are in a folder named DellBIOSProvider. The required .dll files are in a folder named DllFiles. Both folders are located in the same directory as the script file.
Install-DellBiosProvider.ps1 -ModulePath DellBIOSProvider -DllPath DllFiles
Running in a WinPE OS. The DellBIOSProvider module source files are in a folder named DellBIOSProivder. The DellBIOSProvider folder and the required .dll files are located in the same directory as the script file.
Install-DellBiosProvider.ps1 -ModulePath DellBIOSProvider
Installing from the internet and importing the module into the current session.
Install-DellBiosProvider.ps1 -Import
The task sequence step would look like this:
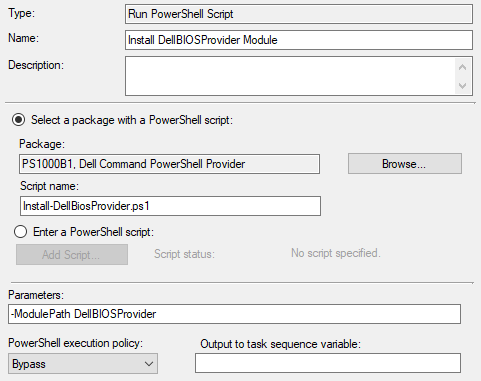
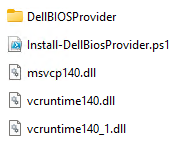
In this example, the package source files would look like this. The DellBIOSProvider module is in the DellBIOSProvider module folder and the required .dll files are in the folder root.
Logging
When the script runs, it will write to a CMTrace-format log file. By default, this log file will be named Install-DellBiosProvider.log. If the script is being run during a task sequence, the log file will be located in the _SMSTSLogPath. Otherwise, the log file will be located in ProgramData\ConfigJonScripts\Dell. The log file name and path can be changed using the LogFile parameter. Note that the log file path will always be set to _SMSTSLogPath when run during a task sequence.
View and Modify BIOS Settings
Once the DellBIOSProvider module has been installed, it needs to be imported before being used.
Import-Module DellBIOSProvider
The DellBIOSProvider module makes settings available by creating a new PSDrive called DellSmbios:. This drive contains a list of all of the available settings on the system. These settings can be read by using Get-Item or Get-ChildItem and can be modified by using Set-Item. Here are a few examples of listing and modifying settings.
#Check the status of the admin password
Get-Item -Path DellSmbios:\Security\IsAdminPasswordSet | Select-Object -ExpandProperty CurrentValue

#Set a new admin password
Set-Item -Path DellSmbios:\Security\AdminPassword NewPassword

#Check the status of the NumLock setting
Get-Item -Path DellSmbios:\POSTBehavior\NumLock | Select-Object -ExpandProperty CurrentValue

#Check the possible values for the NumLock setting
Get-Item -Path DellSmbios:\POSTBehavior\NumLock | Select-Object -ExpandProperty PossibleValues

#Modify the NumLock setting when a BIOS password is not set
Set-Item -Path DellSmbios:\POSTBehavior\NumLock Disabled

#Modify the NumLock setting when a BIOS password is set
Set-Item -Path DellSmbios:\POSTBehavior\NumLock Disabled -Password MyPassword

#List all available BIOS Settings
$DellSettings = Get-ChildItem -Path DellSmbios:\
ForEach ($Setting in $DellSettings)
{
    Get-ChildItem -Path "DellSmbios:\$($Setting.Category)" -WarningAction SilentlyContinue  | Select-Object PSChildName,Attribute,CurrentValue,PossibleValues
}
For more information on using the Dell PowerShell Provider, refer to the official documentation: Reference Guide, User Guide. Also, look for a future blog post from me that goes into more depth on Dell BIOS Settings management with PowerShell.