Warning
This post is kept for historical reference. Microsoft LAPS (the standalone “Local Administrator Password Solution” described here) is no longer supported. For new deployments and ongoing management, use Windows LAPS, which is built into Windows and Windows Server.
This post is the second part of a two-part series on configuring and deploying the Microsoft Local Administrator Password Solution (LAPS). The First Post covered the steps needed to configure Active Directory to support LAPS. This post will cover the steps needed to enable the LAPS functionally on devices.
In order for the local administrator password to be randomized on devices, two conditions need to be met.
- The client needs to have a group policy object linked that enables LAPS
- The client needs to have the LAPS group policy client-side extensions installed so it knows what LAPS is
Configure Group Policy to Deploy LAPS Settings
Group Policy is used to configure LAPS settings and to enable the LAPS functionally on targeted devices. The LAPS settings can be added to an existing group policy object, however in this example, a new group policy object will be created to deploy the settings.
Install the LAPS Group Policy Administrative Template
Group policy does not natively know about the LAPS settings. The settings need to be pulled from an administrative template.
- Log onto the computer where the LAPS management utilities were installed
- If the management utilities need to be re-installed, see the Install the LAPS Management Utilities section of the First Post of this series for instructions on doing so
- Open a file explorer window and navigate to C:\Windows\PolicyDefinitions
- Copy the AdmPwd.admx file found in the root of the directory and the AdmPwd.adml file found in the en-US subdirectory
- Paste the files in the group policy central store
- The group policy central store is located at \\domain.fqdn\SYSVOL\domain.fqdn\Policies\PolicyDefinitions
- If no group policy central store exists, refer to the Microsoft Documentation for instructions on creating one
- Log onto the computer where the LAPS management utilities were installed
Create a Group Policy Object to Deploy LAPS Settings
- Open the Group Policy Management Console with an account that has rights to create and deploy group policy objects in the domain
- Right click on the Group Policy Objects folder and select New
- Name the policy and click OK (In this example the policy is named LAPS)
- Right click on the newly created policy and select Edit
- In the Group Policy Management Editor window, expand Computer Configuration > Policies > Administrative Templates > LAPS
- There are 4 settings available
- Enable local admin password management – This setting tells the device to randomize its local administrator password. This setting is required for LAPS to work and should be Enabled
- Password Settings – This setting tells the device what complexity requirements the random password should adhere to. It also tells the device how long the password should be and how often the password should change. This setting is required for LAPS to work and should be Enabled
- Do not allow password expiration time longer than required by policy – If this setting is not set, the password expiration time on a device could manually be set to be longer than the expiration period specified in the Password Settings setting. This setting is optional but recommended.
- Name of administrator account to manage – By default, LAPS will manage the password of the built-in local administrator account. If this setting is enabled, an account other than the built-in administrator account can be managed. This setting is optional
- Once the settings have been configured, close the group policy management editor window
- In the group policy management console, right click on the OU that the policy will be applied to and select Link an Existing GPO
- Select the group policy object that was just created and click OK
Deploy the LAPS Group Policy Client-Side Extension
LAPS is enabled and configured on devices using Group Policy. However, devices do not natively know about the LAPS settings. To have the Group Policy apply correctly, a Group Policy Client-Side Extension (CSE) needs to first be deployed to devices. There are many ways to get the CSE installed on devices. This example will cover how to deploy the CSE using Microsoft Configuration Manager.
Create an Application to Deploy Microsoft LAPS
- Download the LAPS Installer (This example will cover creating an application to deploy the 64-bit LAPS Install)
- Copy the LAPSx64.msi to the network share that acts as the Configuration Manager source directory
- Open the Configuration Manager Admin Console and navigate to Software Library > Application Management > Applications
- Right click on Applications and select Create Application
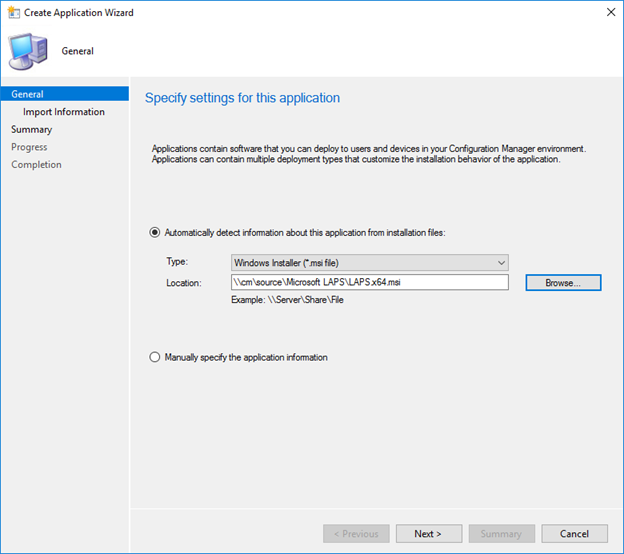
- On the Create Application Wizard window, click the Browse button to select the MSI file that was just copied to the network and then click Next
- On the Import Information screen, click Next
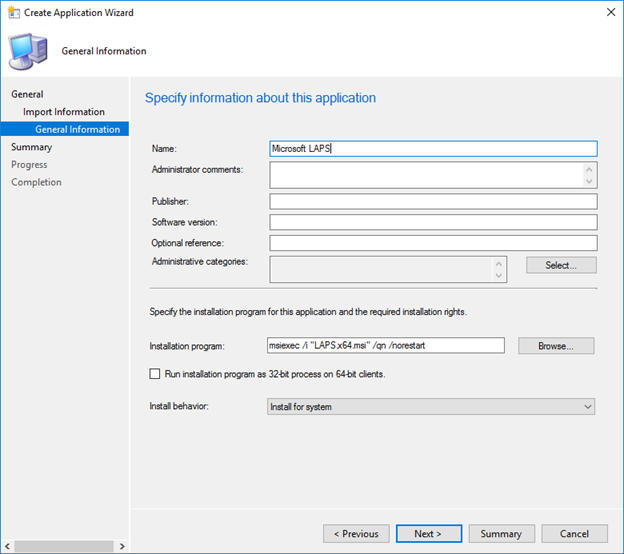
- On the General Information screen
- Specify the name of the application
- In the Install Behavior drop down menu, ensure Install for System is selected
- Verify the installation program command line looks like this
Msiexec /I “LAPSx64.msi” /qn /norestart
- On the Summary screen, click Next
- On the Completion screen, click Close
Distribute the LAPS Application to Distribution Point(s)
- In the Configuration Manager Admin Console, navigate to Software Library > Application Management > Applications
- Right click on the LAPS application that was created in the previous section and select Distribute Content
- On the Distribute Content Wizard window, click Next
- On the Content screen, click Next
- On the Content Distribution screen, click the Add button, then select either a distribution point or a distribution point group to distribute the content to, then click Next
- On the Summary screen, click Next
- On the Completion screen, click Close
Deploy the Microsoft LAPS Application
- In the Configuration Manager Admin Console, navigate to Software Library > Application Management > Applications
- Right click on the LAPS application that was created in the previous section and select Deploy
- On the Deploy Software Wizard window, use the Browse button to select a collection of devices to deploy this application to, then click Next
- On the Content screen, click Next
- On the Deployment Settings screen, choose whether you want to application to be Available (Optional to install through the Software Center) or Required (Automatically installed), then click Next
- On the Scheduling screen, select when the application will be installed on devices, then click Next
- On the User Experience screen, select how the application should appear in the software center and whether or not the application should respect any existing maintenance windows, then click Next
- On the Alerts screen, optionally configure deployment alerting, then click Next
- On the Summary screen, click Next
- On the Completion screen, click Close
Looking up and Resetting Passwords
Now that AD has been configured, the Group Policy Client-Side Extension has been deployed, and the Group Policy Object has been created, LAPS should be functioning on devices. There are two ways to look up passwords for devices, from the properties of the computer object in Active Directory or using the LAPS GUI utility.
Password Lookup in AD
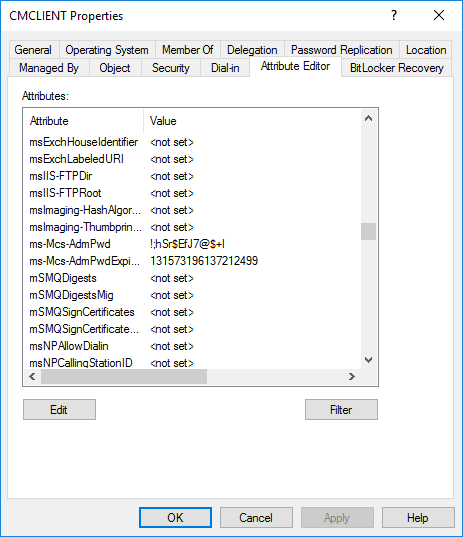
- Open the Active Directory Users and Computers console
- Navigate to a computer object that has a random password set by LAPS
- Right click on the computer object and select Properties
- Select the Attribute Editor tab
- Find the ms-Mcs-AdmPwd attribute
Password Lookup Using the LAPS GUI Utility
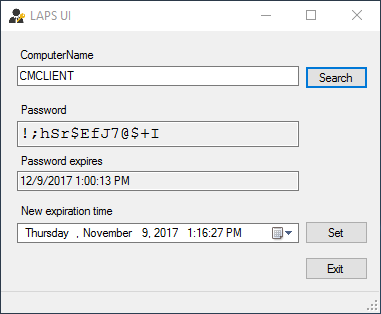
- Download the LAPS Installer
- Run the installer, and at the Custom Setup screen, ensure the Fat Client UI option is selected (This will install the LAPS GUI utility)

- Once the install has completed, open the Start menu and select the LAPS UI application
- In the Window that appears, type the computer name of a device that has a random password set by LAPS, then click Search
- The password for a given device can be reset by manually entering a new time in the New expiration time box and then clicking the Set button
Password Reset Using PowerShell
LAPS passwords can also be reset using a PowerShell cmdlet. Here is an example of what a password reset command would look like
Reset-AdmPwdPassword -ComputerName NameOfComputer -WhenEffective "11.30.2017 17:00"
Password Reset When Re-Imaging a Computer
Consider a scenario where a computer has had its local administrator password randomized by LAPS. The password is set to automatically change every 30 days. This device is re-imaged and re-joined to the domain using the same computer object.
This computer will now have the local administrator password set to whatever the imaging process sets it to. But the computer object in Active Directory will still show the old randomized password. This situation will exist until the 30 day password reset period occurs at which point the local administrator password will once again be randomized.
To get around this issue, the re-imaging process should automatically reset the password reset counter for the device. A PowerShell script that accomplishes this can be found HERE. Simply add this script to your Configuration Manager or MDT task sequence.