This is the first deep dive in the Managing BIOS with Intune series. The goal here is to get from nothing to password material that is ready to deploy as an Intune remediation. That means three things, in order:
- A document-encryption certificate, with its private key delivered to devices.
- BIOS passwords encrypted to that certificate as CMS files.
- Those CMS files embedded into a remediation script.
The actual password and settings remediations are covered in the next two posts. This one is everything that has to be in place first.
The certificate
The Intune scripts protect the BIOS password with CMS encryption. The password is encrypted to a document-encryption certificate, and only a device holding that certificate’s private key can decrypt it. Creating that certificate, choosing between self-signed and enterprise PKI, and the full export/rotation/removal lifecycle are all covered in detail in Document Encryption Certificates for BIOS Password Management.
Important
This post assumes you have followed the instructions in that post to issue and export the certificate. Once done, you should have two files: the public certificate (
.cer) for encrypting passwords, and the certificate with its private key (.pfx) for the devices.
Note
One shared certificate protects all devices. The same certificate (same thumbprint, same private key) has to be present on every device the remediation targets. Keep track of its thumbprint; you will need it again when building the payload.
To get the thumbprint, read it from the certificate you created on your admin workstation:
Get-ChildItem Cert:\CurrentUser\My | Where-Object { $_.Subject -eq 'CN=BIOS Password Encryption' } | Select-Object Subject, ThumbprintOr in the GUI, open
certmgr.msc, find the certificate under Personal > Certificates, double-click it, and look at Details > Thumbprint. The PowerShell value is the clean form the scripts below expect; if you copy it from the Details tab instead, remove the spaces (and any hidden character at the start) before pasting.
Why a script, and not a certificate profile
Intune has built-in options for deploying certificates, so why not utilize those? It comes down to the fact that this model needs the same private key on every device, in the machine store, with no user required. The Intune certificate profiles don’t meet those requirements:
- SCEP profiles have each device generate its own unique key pair and enroll its own certificate. A password encrypted to one device’s certificate can’t be decrypted by any other device.
- PKCS (connector-issued) profiles are per-user or per-device unique.
- PKCS imported certificates can deliver a shared key, but the import is keyed to a user (UPN) and is designed for user-context S/MIME. It doesn’t fit a SYSTEM-context, device-targeted scenario with no user signed in.
The best option is to package the .pfx and import it with a small script. The certificate is installed in Cert:\LocalMachine\My, where the SYSTEM-context remediation reads it.
Deploy the private key with a Win32 app
A Win32 app is the best fit for delivering the certificate. It runs as SYSTEM, it has a detection rule so Intune knows whether the certificate is already present, and it will reinstall automatically if the certificate is ever deleted. (A platform script works too, and is covered at the end of this section, but it has no detection or self-heal.)
1. Create the install script in a working folder, alongside your .pfx. Save this as Install-BiosCert.ps1. Replace YourPfxExportPassword and BiosEnc.pfx with your own values.
$ErrorActionPreference = 'Stop'

$PfxPath = Join-Path -Path $PSScriptRoot -ChildPath 'BiosEnc.pfx'
$PfxPw   = ConvertTo-SecureString 'YourPfxExportPassword' -AsPlainText -Force

Import-PfxCertificate -FilePath $PfxPath -CertStoreLocation Cert:\LocalMachine\My -Password $PfxPw | Out-Null
Import-PfxCertificate imports the key as non-exportable by default, which is what you want, so the installed copy can’t then be re-exported off the machine. Do not add -Exportable.
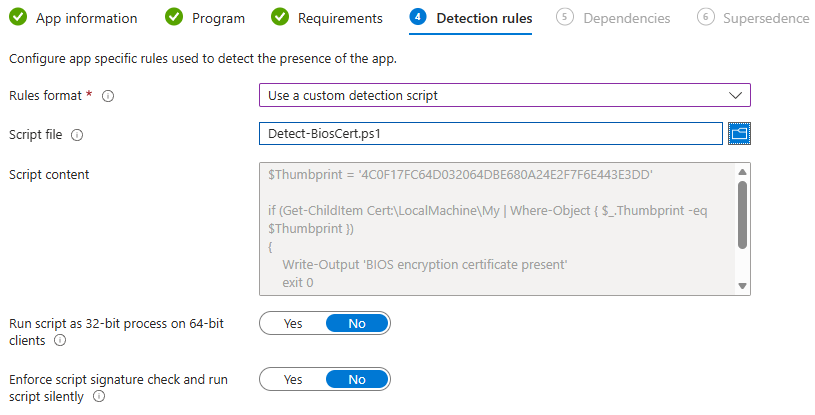
2. Create the detection script. Save this as Detect-BiosCert.ps1. Set the $Thumbprint variable to match the thumbprint of your certificate.
$Thumbprint = 'A1B2C3D4E5F60718293A4B5C6D7E8F90A1B2C3D4'

if (Get-ChildItem Cert:\LocalMachine\My | Where-Object { $_.Thumbprint -eq $Thumbprint })
{
    Write-Output 'BIOS encryption certificate present'
    exit 0
}
exit 1
3. Package the folder. Run the Microsoft Win32 Content Prep Tool against the folder containing BiosEnc.pfx and Install-BiosCert.ps1 to produce a .intunewin file:
IntuneWinAppUtil.exe -c .\CertSource -s Install-BiosCert.ps1 -o .\Output
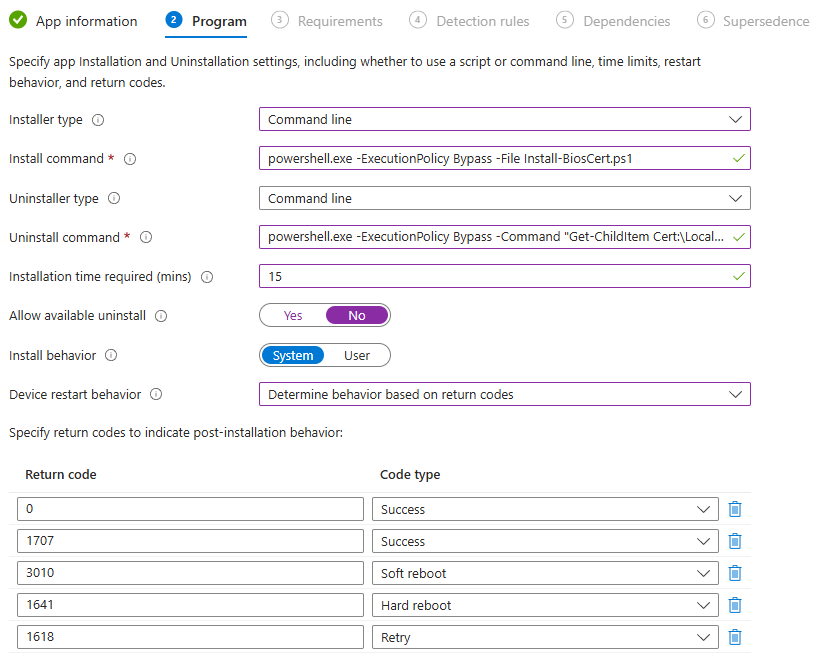
4. Create the app in Intune. In the Intune admin center, go to Apps > Windows > Add and choose Windows app (Win32). Upload the .intunewin, then configure:
- Install command:
powershell.exe -ExecutionPolicy Bypass -File Install-BiosCert.ps1 - Uninstall command: a command that removes the cert, for example
powershell.exe -ExecutionPolicy Bypass -Command "Get-ChildItem Cert:\LocalMachine\My | Where-Object {$_.Thumbprint -eq 'A1B2C3D4E5F60718293A4B5C6D7E8F90A1B2C3D4'} | Remove-Item" - Install behavior: System
- Detection rules: Use a custom detection script, and upload
Detect-BiosCert.ps1.
Caution
The install script holds the
.pfxexport password in plain text, and the.intunewincontains the.pfxitself. The.intunewinwrapper is not secure, anyone with a copy can decode it and recover the contents with public tools. Intune does encrypt content in transit and at rest in the service, and the non-exportable import keeps the key from being pulled back off a device, but neither protects the package on disk. Treat the source folder, the.pfx, its password, and the built.intunewinas shared secrets, and restrict access to the app content and source files.
The platform script alternative
If you would rather not package a Win32 app, a platform script (Intune admin center > Devices > Scripts and remediations > Platform scripts) can run the same Install-BiosCert.ps1. There are a few things to note with this approach:
- Set Run this script using the logged-on credentials to No, so it runs as SYSTEM and can write to
Cert:\LocalMachine\My. - The
.pfxhas to be reachable. With a platform script there is no content bundle, so either embed the certificate in the script as a base64 string and write it to a temp file before importing, or have the script download it from a location the device can reach.
The trade-offs are what make this the fallback rather than the recommended path. Platform scripts run once per device with no detection or retry, so nothing reinstalls the certificate if it is ever removed. Additionally, the Intune Management Extension writes the full script body to a persistent plaintext log on every device, which would include the embedded .pfx. Downloading the .pfx from a reachable location instead avoids that. The Win32 app’s detection rule is what makes it self-healing, which is why it is preferred.
Assign and verify on a device
Assign the app (or platform script) to a device group. Because everything runs in the SYSTEM context, the certificate installs whether or not a user is signed in.
Before building any payload, confirm the certificate actually installed correctly on a test device. The certificate should appear in the local computer certificate store.

Verify the cert in an elevated PowerShell window:
# Verify certificate present in the machine store
Get-ChildItem Cert:\LocalMachine\My |
    Where-Object { $_.Thumbprint -eq 'A1B2C3D4E5F60718293A4B5C6D7E8F90A1B2C3D4' } |
    Format-List Subject, Thumbprint, NotAfter, HasPrivateKey
HasPrivateKey must be True. If the certificate is listed but HasPrivateKey is False, the import didn’t install the key, and decryption will fail.
Encrypt the BIOS password
Using the public certificate (.cer) file, encrypt each password version you intend to deploy with Protect-CmsMessage:
Protect-CmsMessage -To .\BiosEnc.cer -Content 'TheBiosPassword' -OutFile .\pw-v1.cms
The Intune scripts use a rolling window of password versions so that devices a version or two behind can roll themselves forward. Each version is its own CMS file, numbered in order:
Protect-CmsMessage -To .\BiosEnc.cer -Content 'OldPassword' -OutFile .\pw-v3.cms
Protect-CmsMessage -To .\BiosEnc.cer -Content 'CurrentPassword' -OutFile .\pw-v4.cms
Protect-CmsMessage -To .\BiosEnc.cer -Content 'NewPassword' -OutFile .\pw-v5.cms
The .cms files are ciphertext and are safe to keep alongside your other content. To clear the password instead of setting one, you don’t encrypt anything special. Clearing is driven by the remediation’s target version (covered in the next post), but you still need the CMS file for the version that is currently on the device so the script can unlock the BIOS to clear it.
For more detailed information on the CMS workflow, see Securing BIOS Passwords.
Decrypt the BIOS password
On a device where the .pfx has been installed, test decrypting a CMS file. The test should be run as SYSTEM, since that is the context the remediation runs in. Using PsExec to get a SYSTEM prompt:
# From an elevated prompt, launch PowerShell as SYSTEM
psexec -s -i powershell.exe

# In the SYSTEM session, decrypt a test .cms file
Unprotect-CmsMessage -Path 'C:\Temp\pw-v1.cms'
If that returns your password, the certificate is correctly in place and usable by the remediation. If it errors, the remediation would log cert-missing and exit, so resolve it here before going further.
Build the deployable remediation
The last step turns the .cms files into a ready-to-assign remediation script. The remediation scripts are templates: each one contains a marked block that Build-IntunePayload.ps1 fills in.
# <Payload>
$IntunePayload = $null
# </Payload>
Build-IntunePayload.ps1 (in the repo’s Tools folder) reads the .cms files, base64-encodes them, and rewrites that block with a populated $IntunePayload hashtable. Point it at the remediation script and it writes a deployable copy.
If your versions start at 1 and are contiguous, pass the files in order and they’re numbered positionally:
.\Build-IntunePayload.ps1 `
    -CmsFile '.\pw-v1.cms', '.\pw-v2.cms', '.\pw-v3.cms' `
    -CertThumbprint 'A1B2C3D4E5F60718293A4B5C6D7E8F90A1B2C3D4' `
    -TemplateFile '.\Manage-DellBiosPasswords-WMI-Remediate.ps1' `
    -OutputFile '.\Deploy\Manage-DellBiosPasswords-WMI-Remediate.ps1'
If your version numbers don’t line up with that 1, 2, 3… sequence (a window that has rolled forward to versions 3, 4, 5, or one with gaps) map each version to its file explicitly:
.\Build-IntunePayload.ps1 `
    -VersionFiles @{ 3 = '.\pw-v3.cms'; 4 = '.\pw-v4.cms'; 5 = '.\pw-v5.cms' } `
    -CertThumbprint 'A1B2C3D4E5F60718293A4B5C6D7E8F90A1B2C3D4' `
    -TemplateFile '.\Manage-DellBiosPasswords-WMI-Remediate.ps1' `
    -OutputFile '.\Deploy\Manage-DellBiosPasswords-WMI-Remediate.ps1'
Important
The
-CertThumbprintyou pass here must be the same certificate you used to encrypt the.cmsfiles and the same one you deployed to devices. The thumbprint is embedded in the payload so the remediation can find the matching certificate at runtime; if it doesn’t match the certificate on the device, the script reportscert-missingand exits.
The same command works for every remediation script. Point -TemplateFile at the Dell, HP, or Lenovo remediation you’re deploying. The settings and passwords remediations carry their own copy of the password payload, so they’re built the same way.
Build-IntunePayload.ps1 prints the size of the generated script and warns if it crosses Intune’s remediation size limit (around 200 KB). With a typical three-version window there’s a comfortable margin.
The output file is what you upload to Intune as the remediation half of the detection/remediation pair. The detection half of the pair does not have a payload and does not require the same build process.
What you have now
At this point the device has the certificate, you have a set of CMS-encrypted password versions, and you have a remediation script with the payload baked in. That’s the entire prerequisite chain.