Update - May 20th, 2026
The HP Client Management Script Library has been around for several years now and has grown considerably since I originally wrote this post. The HPCMSL module now includes 14 sub-modules and supports both PowerShell 5.1 and PowerShell 7. I’ve updated the PowerShell script and the content in this post to reflect the current state of the HPCMSL module. For details on what has changed, see the “What Changed” section at the bottom of this post.
If you’ve been keeping up with my blog posts, you’ll know that HP natively provides a few WMI classes and methods to the Windows OS. These WMI classes work great for managing BIOS settings, but what if I want to manage firmware updates or work with HP Softpaqs? One answer is to use the HP Client Management Script Library. The HP CMSL is a bundle of PowerShell modules created by HP for the purpose of managing HP firmware and drivers from the command line.
If you’re just here for the script, you can find it on my GitHub: https://github.com/ConfigJon/Firmware-Management/blob/master/HP/Install-HPCMSL.ps1
Prerequisites
The only prerequisite for running the Client Management Script Library in full Windows is PowerShell version 5.1 or newer. PowerShell 7 is also supported. Before the HP CMSL can be run from WinPE, these components need to be added to the boot image.
- Microsoft .NET (WinPE-NetFx)
- Scripting (WinPE-Scripting)
- Scripting (WinPE-WMI)
- Windows PowerShell (WinPE-PowerShell)
The WinPE-Scripting and WinPE-WMI components are included in Configuration Manager boot images by default. The WinPE-NetFx and WinPE-PowerShell components need to be added in the Optional Components tab of the boot image properties window.
Installation
There are several ways to install the HP Client Management Script Library.
- Install using the executable installer provided by HP
- Install using the Windows Package Manager (WinGet)
- Install from the PowerShell Gallery using Install-Module
- Copy the HPCMSL module files into the PowerShell modules directory
Executable Install
HP provides an installer than can be run in a full Windows OS. The installer can be downloaded from HERE. The executable is an InnoSetup installer and will take any of the standard InnoSetup switches. A basic silent install of the executable would look like this.
hp-cmsl-latest.exe /VERYSILENT
WinGet Install
The HPCMSL module is available in the Windows Package Manager (WinGet).
#Search for the module
winget search --id HP.HPCMSL

#Install HPCMSL
winget install --id HP.HPCMSL --source winget
PowerShell Gallery Install
HP has also made the Client Management Script Library modules available on the PowerShell gallery. This means that any computer with internet access can install the modules using the Install-Module PowerShell cmdlet.
#Install the HPCMSL modules and prompt for install and license agreement
Install-Module -Name HPCMSL

#Install the HPCMSL modules and suppress the install and license agreement prompts
Install-Module -Name HPCMSL -Force -AcceptLicense
This seems like all that should be required for the install. However there are a couple pre-requisites when installing directly from the PowerShell Gallery.
- The NuGet Package Provider needs to be installed
- The PowerShellGet module should be up to date
If you frequently install PowerShell modules on your system, these requirements are almost certainly already taken care of. However, on systems that have an old PowerShellGet module, installing the latest version may require opening a new PowerShell session before the updated cmdlets become available. The Install-HPCMSL.ps1 script in the next section handles this automatically by re-launching itself after the update.
File Copy Install
Both the executable install and the PowerShell Gallery install result in some files and folders being copied into Program Files\WindowsPowerShell\Modules (PowerShell 5.1) or Program Files\PowerShell\Modules (PowerShell 7). So instead of using one of those automated install options, the files could just be manually copied.
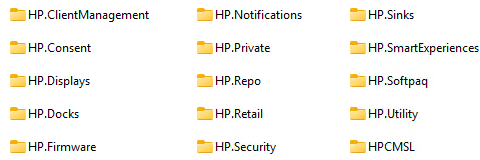
These are the folders that need to be copied.
These folders can be obtained in multiple ways. The HP Client Management Script Library could be installed on a machine using either the executable or Install-Module cmdlet. Then the files could be copied from the modules directory. Alternatively, the files could be downloaded directly from the PowerShell Gallery.
- HP.ClientManagement
- HP.Consent
- HP.Displays
- HP.Docks
- HP.Firmware
- HP.Notifications
- HP.Private
- HP.Repo
- HP.Retail
- HP.Security
- HP.Sinks
- HP.SmartExperiences
- HP.Softpaq
- HP.Utility
- HPCMSL
The much easier way to get a complete, correctly-laid-out copy of every module is to use Save-Module on a machine with internet access.
On a stock Windows install, you will first need to update the NuGet package provider and the PowerShellGet module. The versions of both that ship with Windows are too old to read HPCMSL’s current module manifests, and Save-Module will fail. Run the following in an elevated PowerShell session, then start a new PowerShell session before continuing:
[Net.ServicePointManager]::SecurityProtocol = [Net.ServicePointManager]::SecurityProtocol -bor [Net.SecurityProtocolType]::Tls12
Install-PackageProvider -Name NuGet -MinimumVersion 2.8.5.201 -Force
Install-Module -Name PowerShellGet -Force -AllowClobber
With those out of the way, the Save-Module command itself is:
Save-Module -Name HPCMSL -Path C:\HPCMSL
This pulls down the HPCMSL module along with every dependency, into folders named exactly the way PowerShell expects. The resulting C:\HPCMSL folder can then be copied to any other system.
Note that in order for the modules to be detected by PowerShell, they need to be correctly named. The folder name needs to be the same as the name of the module it contains.
This is the method that would need to be used when installing the HP Client Management Script Library in WinPE. This is because WinPE doesn’t support installing modules directly from the PowerShell Gallery and also does not allow for installing from an executable.
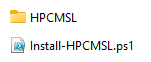
Install-HPCMSL.ps1
I decided to create a PowerShell script to automate the PowerShell Gallery and file copy install methods for the HP Client Management Script Library. The script can be run either in online mode or offline mode.
When running the script in online mode, it queries the PowerShell Gallery for the HPCMSL module and its dependencies, compares the latest version against what’s installed locally, and installs or updates as needed. In PowerShell 5.1 it also installs or updates the NuGet package provider and the PowerShellGet module as needed; PowerShell 7 ships with current versions of both, so that step is skipped there. TLS 1.2 is enforced before reaching the PowerShell gallery. Running the script in online mode requires a full Windows OS with internet access.
When running the script in offline mode, it discovers the HPCMSL modules in a local folder, compares each one against the locally installed version, and copies the newer files where needed.
The script has four optional parameters.
ModulePath – Used to specify the location of the HPCMSL module source files. If the parameter is specified, the script runs in offline mode; otherwise it runs in online mode. Specify this when the script is running in WinPE or when the system does not have internet access.
AllEditions – When specified, the modules are installed for both PowerShell 5.1 (Program Files\WindowsPowerShell\Modules) and PowerShell 7 (Program Files\PowerShell\Modules). Without it, the script installs only for the PowerShell edition currently running the script.
Import – When specified, the HPCMSL module is imported into the current session after installation. This is off by default. An import only affects the session running the script. A separate follow-up process (such as a later Intune or Configuration Manager step) starts a fresh session and has to import the modules it needs itself. When running in WinPE, the full module cannot be imported. Some sub-modules (such as HP.Notifications) depend on Windows Runtime APIs that WinPE doesn’t include. If you pass -Import in WinPE, the failed import is logged as a warning rather than failing the run. Individual compatible modules (such as HP.Firmware and HP.Softpaq) can still be imported directly.
LogFile – Used to override the default log file path. The file must have a .log extension. During a task sequence the log directory is always set to _SMSTSLogPath regardless of any value passed in.
Examples
Run the script in online mode
Install-HPCMSL.ps1
Run the script in offline mode
Install-HPCMSL.ps1 -ModulePath HPCMSL
Install and import the module into the current session
Install-HPCMSL.ps1 -Import
Use a custom log file location
Install-HPCMSL.ps1 -LogFile C:\Logs\HPCMSL.log
Install for both PowerShell 5.1 and PowerShell 7
Install-HPCMSL.ps1 -AllEditions
A note on -AllEditions and how PowerShell 7 is installed. As of version 7.6.0, winget installs PowerShell 7 as an MSIX package by default. MSIX installs are registered per-user. On a freshly-imaged machine where no user has installed PowerShell 7, it won’t be present for the SYSTEM account that runs a task sequence and -AllEditions will log that it’s skipping the PowerShell 7 install. (When PowerShell 7 is present, the script can discover and use it from SYSTEM, including MSIX installs under Program Files\WindowsApps.) If you depend on -AllEditions in an unattended deployment, install PowerShell 7 from the MSI package instead — winget install --id Microsoft.PowerShell --source winget --installer-type wix, or the standalone MSI from GitHub, which installs system-wide and is available to every account.
When the script is running in offline mode, it expects a specific folder structure. Each of the HP Client Management Script Library modules should sit in the root of the folder specified in the ModulePath parameter, with the module name as the folder name. Each module folder should contain a single sub-folder named for the module’s version, and that sub-folder contains the actual module files.
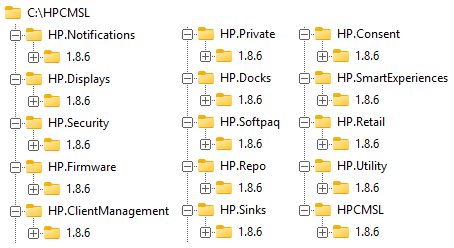
The script discovers whatever module folders are present rather than checking against a fixed list, so you don’t need to keep this list in sync as HP adds or removes modules from the package. Any folder that’s missing a version sub-folder or a matching .psd1 file is logged and skipped.
The easiest way to produce a correctly structured directory is Save-Module HPCMSL -Path <folder>, as shown earlier. That one cmdlet creates the entire layout the script expects.
This script can be run as part of a Configuration Manager task sequence to install the modules either in WinPE or the full Windows OS. The task sequence step would look like this:

Logging
The script will create a CMTrace-format log file named Install-HPCMSL.log. When running outside of a task sequence, the log file will be located in ProgramData\ConfigJonScripts\HP by default. The -LogFile parameter can be used to override that location. When running inside of a task sequence, the log file will be located in the _SMSTSLogPath regardless of any -LogFile value passed in.
What changed in the 2026 update
The script and HPCMSL itself have both evolved since this post was originally published. The highlights:
- The HPCMSL package has grown from 8 to 15 modules, new modules include
HP.Consent,HP.Displays,HP.Docks,HP.Notifications,HP.Retail,HP.Security, andHP.SmartExperiences. The script now discovers new modules dynamically, so no maintenance should be needed if HP adds more. - PowerShell 7 is now supported, including the new
-AllEditionsswitch that installs to both the PowerShell 5.1 and PowerShell 7 module paths in one run. - TLS 1.2 is enforced automatically when connecting to the PowerShell Gallery.
- The module is no longer force-imported at the end by default. The script now verifies the install with a
Get-Module -ListAvailablediscoverability check and only imports the module when you pass the new-Importswitch. This avoids unnecessary imports in situations where the module won’t be used immediately. - Several bug fixes including correct numeric version comparison for NuGet and PowerShellGet,
-Scope AllUserson the gallery install so SYSTEM contexts can find the modules afterward, and propagation of the rerun child’s exit code so task sequences see failures instead of silent zero-exits.
The script’s in-file .CHANGELOG block has the complete list.
Additional Reading
Read more about using the HP Client Management Script Library in HP’s official documentation. For another HPCMSL deployment option using Configuration Manager CIs, see Gary’s post on the topic.